designing for extrusion
Designing for the extrusion process is also very intuitive. As in most fabrication processes, ideas such as wall thickness, radii, fillets, etc. are often important to good manufacturability and extended die life.
Our engineering staff is available around the clock to help you get the most out of your investment.
linear tolerancing
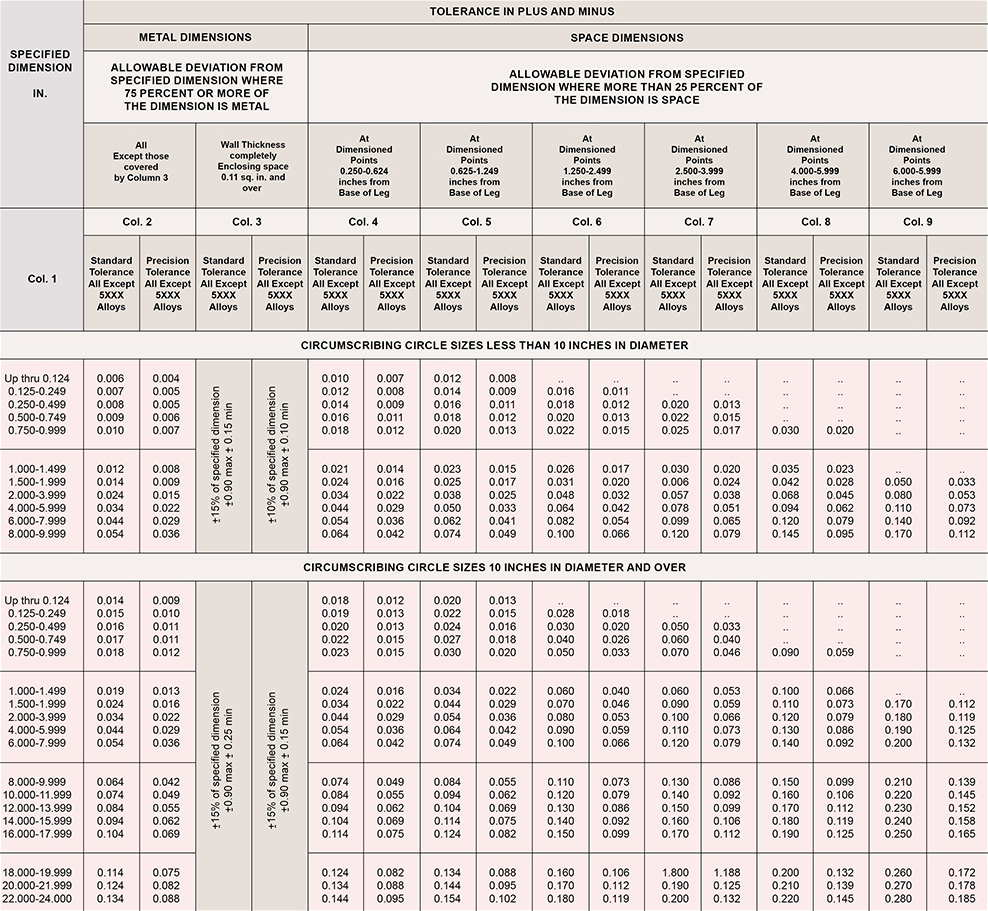
Footnotes:
1. These Standard and Precision Tolerances are applicable to the average profile. The extrusion conditions required to produce the wide variety of alloy-temper and profile combinations require close review between customer and producer to determine critical characteristics and tolerance capability. Aggressive profile characteristics may require wider than standard tolerance and closer than precision tolerance may be feasible for other characteristics.
2. The tolerance applicable to a dimension composed of two or more component dimensions is the sum of the tolerances of the component dimensions if all of the component dimensions are indicated.
3. When a dimension tolerance is specified other than as an equal bilateral tolerance, the value of the standard tolerance is that which applies to the mean of the maximum and minimum dimensions permissible under the tolerance for the dimension under construction.
4. Where dimensions specified are outside and inside, rather than wall thickness itself, the allowable deviation (eccentricity) given in Column 3 applies to the mean wall thickness. (Mean wall thickness is the average of two wall thickness measurements taken at opposite sides of the void.)
5. In the case of Class 1 Hollow Profiles the standard wall thickness tolerance for extruded round tube is applicable. (A Class 1 Hollow Profile is one whose void is round and one inch or more in diameter and whose weight is equally distributed on opposite sides of two or more equally spaced axes.)
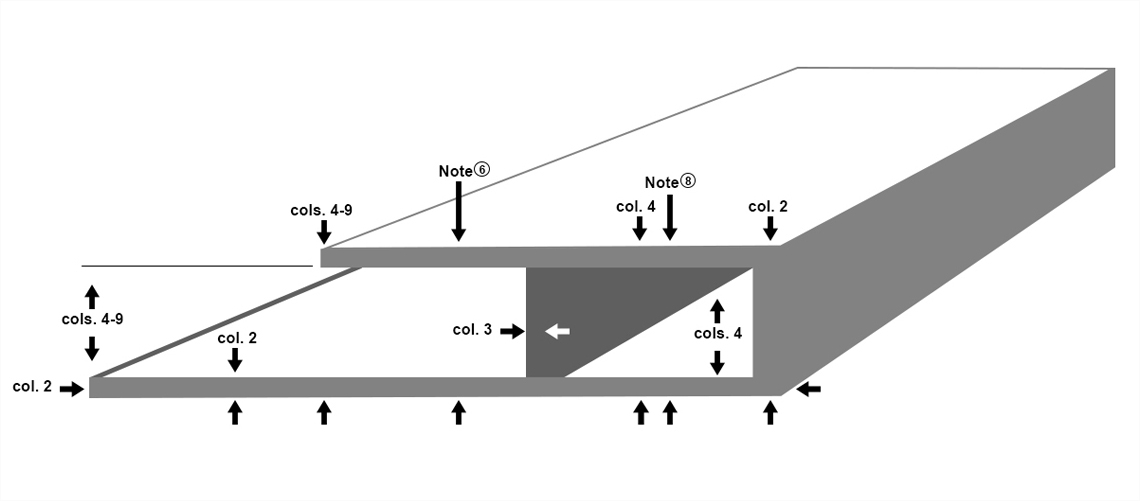
6. At points less than 0.250 inch from base of leg, the tolerances in Col. 2 are applicable.
7. Tolerances for extruded profiles in T3510, T4510, T6510, T73510, T76510, and T8510 tempers shall be agreed upon between purchaser and vendor at the time the contract or order is entered.
8. The following tolerances apply where the space is completely enclosed (hollow profiles): For the width (A), the balance is the value shown in Col. 4 for the depth dimension (D). For the depth (D), the tolerance is the value shown in Col. 4 for the width dimension (A). In no case is the tolerance for either width or depth less than the metal dimensions (Col. 2) at the corners.
9. The wall thickness tolerance for hollow or semihollow profiles shall be as agreed upon between purchaser and vendor at the time contract or order is entered when the nominal thickness of one wall is three times or greater than that of the opposite wall.
10. For those 5XXX alloys with a magnesium content greater than or equal to 4.0% nominal, tolerances are 150% of those values shown in the standard tolerance columns.
wall thickness

twist

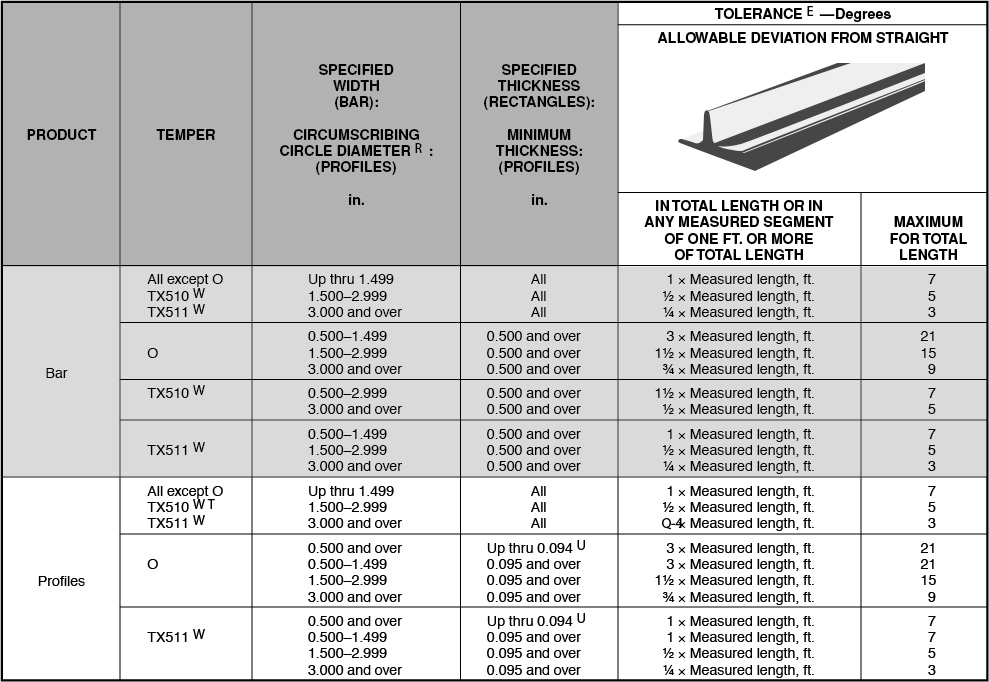
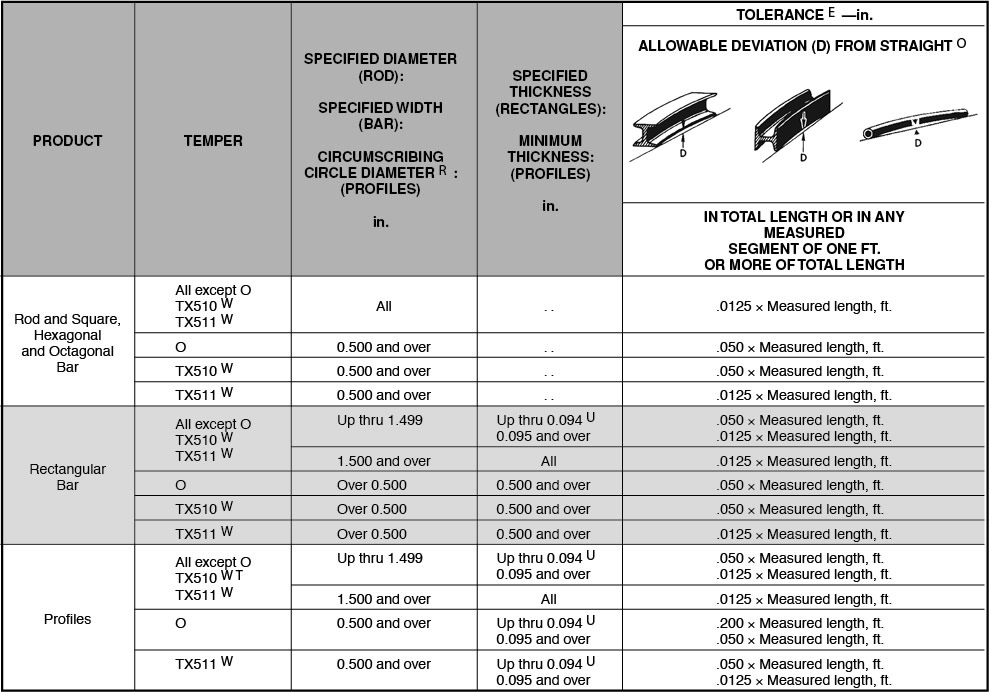
Straightness

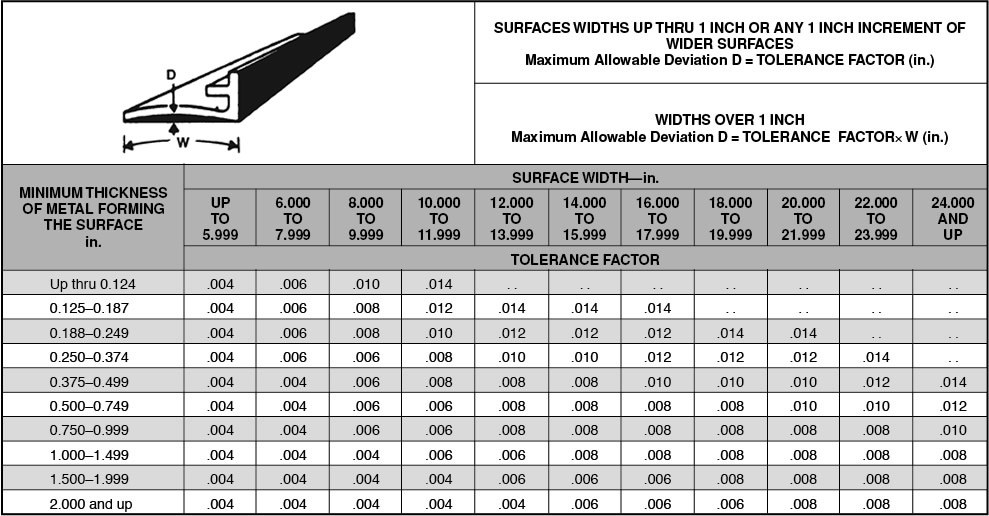
Flatness

misc design elements
| Saw-cut Tolerance |
Standard +/-.020 to +/-.030, depending upon profile size. However, closer tolerances of +/-.006 can be achieved on a case-by-case basis. |
| Surface Finish |
Standard 63 RMS mill finish. 32 RMS available upon request. |
| Finish Radii |
For maximum die life, R 1/32" preferred. R .010" is generally regarded minimum. |

 Footnotes:
1. These Standard and Precision Tolerances are applicable to the average profile. The extrusion conditions required to produce the wide variety of alloy-temper and profile combinations require close review between customer and producer to determine critical characteristics and tolerance capability. Aggressive profile characteristics may require wider than standard tolerance and closer than precision tolerance may be feasible for other characteristics.
2. The tolerance applicable to a dimension composed of two or more component dimensions is the sum of the tolerances of the component dimensions if all of the component dimensions are indicated.
3. When a dimension tolerance is specified other than as an equal bilateral tolerance, the value of the standard tolerance is that which applies to the mean of the maximum and minimum dimensions permissible under the tolerance for the dimension under construction.
4. Where dimensions specified are outside and inside, rather than wall thickness itself, the allowable deviation (eccentricity) given in Column 3 applies to the mean wall thickness. (Mean wall thickness is the average of two wall thickness measurements taken at opposite sides of the void.)
5. In the case of Class 1 Hollow Profiles the standard wall thickness tolerance for extruded round tube is applicable. (A Class 1 Hollow Profile is one whose void is round and one inch or more in diameter and whose weight is equally distributed on opposite sides of two or more equally spaced axes.)
6. At points less than 0.250 inch from base of leg, the tolerances in Col. 2 are applicable.
7. Tolerances for extruded profiles in T3510, T4510, T6510, T73510, T76510, and T8510 tempers shall be agreed upon between purchaser and vendor at the time the contract or order is entered.
8. The following tolerances apply where the space is completely enclosed (hollow profiles): For the width (A), the balance is the value shown in Col. 4 for the depth dimension (D). For the depth (D), the tolerance is the value shown in Col. 4 for the width dimension (A). In no case is the tolerance for either width or depth less than the metal dimensions (Col. 2) at the corners.
9. The wall thickness tolerance for hollow or semihollow profiles shall be as agreed upon between purchaser and vendor at the time contract or order is entered when the nominal thickness of one wall is three times or greater than that of the opposite wall.
10. For those 5XXX alloys with a magnesium content greater than or equal to 4.0% nominal, tolerances are 150% of those values shown in the standard tolerance columns.

